|
|
|||||||||
| Software: RF Cascade Workbook | RF Symbols for Office | RF Symbols & Stencils for Visio | Espresso Workbook | ||||||||||
|
|||||||||||||||||||||||||||||||
  |
  |
||||||||||||||||||||||||||||||
|
Please Support RF Cafe by purchasing my ridiculously low-priced products, all of which I created. RF & Electronics Symbols for Visio RF & Electronics Symbols for Office RF & Electronics Stencils for Visio T-Shirts, Mugs, Cups, Ball Caps, Mouse Pads These Are Available for Free |
|||||||||||||||||||||||||||||||


What Is Roaming Aggressiveness In Wifi
What Is Roaming Aggressiveness In Wifi
What Is Roaming Aggressiveness In Wifi
Roaming aggressiveness is typically configured on a scale—often from 1 (Lowest) to 100 (Highest), or via qualitative labels (Low, Medium, High). This scale represents the trigger point for a handoff scan.
Understanding roaming aggressiveness moves from theory to power when applied. There is no “best” setting; there is only the correct setting for a given environment.
Scenario 1: The High-Density Office. Here, APs are deliberately overlapped, with transmit power turned down to encourage handoffs. High aggressiveness is essential. It ensures that as a user walks from a conference room to a cubicle, their laptop instantly jumps to the nearest AP, maintaining a clean VoIP call.
Scenario 2: The Large Home with Two APs. A common mesh system or a router plus an extender, with a “dead zone” in the middle. Medium or Medium-High is optimal. Too low, and you’ll get stuck on the distant router. Too high, and devices will roam in the overlap zone, causing instability. The goal is to create a decisive “handoff zone” where the old AP is weak enough to leave, but the new AP is strong enough to justify the cost.
Scenario 3: The Industrial or IoT Environment. Think of a temperature sensor in a warehouse. It moves slowly, if at all. Low aggressiveness is mandatory. Frequent roaming would drain batteries and risk disconnection. It is better for the sensor to tolerate a -80 dBm signal than to roam every few minutes.
Roaming decisions affect throughput, latency, and user experience in multi-AP Wi‑Fi networks. We examine signal-based and quality-based triggers, scanning methods, and impacts on real-time traffic.
On Windows (Intel Wi-Fi adapters) :
On macOS – No direct user setting; it’s managed by the system driver.
On Linux – Via iwconfig or wpa_supplicant (e.g., bgscan parameters).
On Android / iOS – Generally not exposed, controlled by the OS/driver.
Roaming aggressiveness doesn't measure absolute signal strength alone. It uses a trigger mechanism based on the difference in signal quality between your current AP and a candidate AP.
Let's say your current AP has a signal of -70 dBm (decent, but not great). A new AP nearby has -65 dBm (better).
Most drivers (Intel, Realtek, Broadcom) implement this on a scale of 1 (Lowest) to 5 (Highest).
Wi-Fi devices do not constantly scan for new networks because scanning drains battery and interrupts data flow. They wait until the current signal drops below a certain level to trigger a "roam."
This setting controls the Trigger Level:
| Scenario | Recommended Setting | |----------|----------------------| | Home with a single AP | Low or Lowest — roaming unnecessary. | | Small office, few APs | Medium (default) — works well. | | Dense office / campus | Medium or High — helps sticky clients. | | High mobility (VoWiFi, roaming while walking) | High — faster handoffs. | | Gaming or real-time apps | Medium — avoids ping-pong but prevents lag spikes. | | Legacy / poorly placed APs | Lower — prevents constant thrashing. |
Roaming aggressiveness solves a classic engineering trade-off: loyalty vs. agility.
Too loyal, and you suffer poor performance in weak signal areas. Too agile, and you suffer instability as your device bounces between APs. The right setting depends entirely on your environment and how you move through it. For most people, the default "Medium" setting is the sweet spot—but now you know exactly which knob to turn when it's not.
Roaming aggressiveness (also called roaming sensitivity or roaming threshold) in Wi‑Fi refers to how readily a client device (phone, laptop, IoT device) disconnects from its current access point (AP) and switches (roams) to a different AP offering better link quality. It’s a client-side behavior controlled by drivers/firmware and often exposed as settings like Low/Medium/High, a numeric threshold (dBm), or a retry/scan timer. Roaming decisions affect connectivity stability, throughput, latency, and power use.
Key concepts
Impacts of roaming aggressiveness
Mechanics: how devices decide to roam Common decision inputs and heuristics:
Examples
Measurement and tuning
Security and roaming
Design recommendations (practical)
Noteworthy research directions and open problems
Concise actionable checklist for admins
If you’d like, I can: (A) produce a formatted short paper (2–4 pages) with abstract, background, experiments, results, and references; (B) create configuration examples for specific AP vendors (Cisco, Aruba, UniFi); or (C) draft test procedures and scripts to measure roaming behavior on clients. Which do you want?
Why Your Wi-Fi "Sticks" to the Wrong Router: Understanding Roaming Aggressiveness
Have you ever walked from your living room to your bedroom, only to find your phone clinging to a weak one-bar signal from the main router instead of switching to the mesh satellite right next to you?
This frustrating "sticky Wi-Fi" syndrome is dictated by a setting called Roaming Aggressiveness
. Here is a deep dive into what it is, how it works, and how to tune it for a seamless connection. What is Roaming Aggressiveness?
Roaming Aggressiveness (sometimes called "Roaming Sensitivity") is a configuration setting in your device’s Wi-Fi adapter that determines how eagerly it hunts for a new wireless access point (AP).
In a world with only one router, this setting wouldn't matter. But in offices, large homes with mesh systems, or university campuses, your device is constantly surrounded by multiple "nodes" all broadcasting the same network name (SSID). Roaming Aggressiveness tells your device exactly when it’s time to "break up" with its current AP and "marry" a stronger one. How It Works: The "Threshold" Logic
Your device doesn't just switch because it sees a prettier signal. It uses a specific signal strength threshold, measured in (decibels-milliwatts). Low Aggressiveness:
Your device is loyal. It will hang onto its current connection until the signal is almost non-existent (e.g., -80 dBm). High Aggressiveness:
Your device is restless. As soon as the current signal dips even slightly (e.g., -65 dBm) and it sees a better option, it jumps ship. The Five Standard Levels
If you look into your Windows Device Manager or network controller settings, you’ll typically see five levels:
The device will only roam if the current signal is unusable. Best for stationary desktops. Medium-Low:
A balance for devices that move occasionally but stay within a primary zone. Medium (Default): The "Goldilocks" zone for most laptops and smartphones. Medium-High: what is roaming aggressiveness in wifi
Recommended for fast-moving environments (like a motorized cart in a warehouse).
The device is constantly scanning. It will jump to any AP that provides a marginally better signal than the current one. The Pros and Cons of Going "Aggressive"
It might seem like "Highest" is the obvious choice, but it comes with trade-offs: High Aggressiveness Low Aggressiveness Signal Strength Usually optimal; you stay on the strongest AP. Can lead to "Sticky Client" (slow speeds on weak signal). Battery Life Constant scanning for new APs drains power. The radio stays locked and doesn't hunt. Risk of "Ping-Ponging" between two APs, causing drops. Very stable connection, even if slow. When Should You Change It? Turn it UP if:
You have a Mesh Wi-Fi system or multiple APs and your laptop stays connected to the distant router downstairs while you are sitting next to the upstairs node. Turn it DOWN if:
Your connection frequently drops for a split second, or if you notice your device constantly switching between two nearby access points even when you aren't moving. How to Change the Setting (Windows) Right-click the Start button and select Device Manager Network adapters
Right-click your Wi-Fi card (e.g., Intel Wi-Fi 6E) and select Properties Scroll down to Roaming Aggressiveness and adjust the value. Final Thoughts
Roaming Aggressiveness is the "personality" of your device’s Wi-Fi. While the default setting works for most, understanding how to tweak it can be the difference between a frustratingly slow connection and a seamless transition as you move through your space. measure your signal strength in dBm to find your perfect roaming threshold?
Roaming Aggressiveness (sometimes called Roaming Sensitivity) is a configuration setting for your Wi-Fi adapter that determines how "eager" your device is to switch from its current Access Point (AP) to a stronger one. Core Definition
It defines the signal strength threshold at which your Wi-Fi card begins scanning for a better connection. In environments with multiple APs—like offices, campuses, or homes with mesh systems—this setting controls the "handoff" process. Level-by-Level Breakdown Most drivers (especially Intel) offer five distinct levels:
1. Lowest: The device is "sticky." It will stay connected to its current AP until the signal is nearly dead or suffers severe degradation.
2. Medium-Low / 4. Medium-High: Intermediate steps to fine-tune the balance between stability and performance.
3. Medium: The default "balanced" setting recommended for most users.
5. Highest: The device constantly monitors link quality. It will trigger a roam even if the current signal is still functional but a slightly better one is detected. Pros and Cons of High Aggressiveness Connection Quality
Pro: Automatically keeps you on the strongest available signal as you move. Convenience
Pro: Removes the need to manually disconnect and reconnect to closer routers. Battery Life
Con: Can drain laptop batteries faster because the Wi-Fi card is constantly scanning. Stability
Con: Can cause "thrashing," where the device bounces between two APs of similar strength, leading to brief lag spikes or interruptions. When to Change It
Set to High: If you frequently move around a large office or home and find your device stays stuck on a weak, far-away router even when you are standing next to a closer one.
Set to Low: If you are a gamer or use VoIP/Video calls and notice stuttering or lag spikes. This "locks" the connection to one AP to prevent the momentary drop-out that occurs during a handoff. How to Access the Setting
On Windows 10/11, you can adjust this through the Device Manager: On macOS – No direct user setting; it’s
Improving Wi-Fi for Gaming: Optimize Roaming Settings | TikTok
Understanding Wi-Fi Roaming Aggressiveness Roaming aggressiveness (sometimes called "roaming sensitivity") is
a configuration setting for your device's Wi-Fi adapter that determines how "eagerly" it seeks out a new access point (AP) when the current signal weakens
In a Wi-Fi network with multiple access points—like a large office, campus, or a home with a mesh system—your device is responsible for deciding when to "roam" from one AP to another. This setting essentially defines the "breaking point" for your current connection. Cisco Meraki Documentation How Different Levels Impact Your Connection
Most Windows devices offer five levels of roaming aggressiveness, typically found in the tab of your Wi-Fi adapter's properties: Change WiFi Roaming Sensitivity or Aggressiveness [Guide]
Understanding Wi-Fi Roaming Aggressiveness In the world of wireless networking, "Roaming Aggressiveness" (sometimes called Roaming Sensitivity) is a setting that determines how "eager" your device is to switch from its current Wi-Fi access point (AP) to another one with a better signal.
If you have ever carried your laptop from the living room to the home office and noticed it stays connected to the distant living room router with one bar of signal instead of switching to the office extender right next to you, you’ve encountered a roaming issue. How It Works: The Roaming Threshold
Your Wi-Fi adapter constantly monitors its current connection's signal strength (RSSI). Roaming aggressiveness essentially sets the "breaking point" or threshold for that connection.
Low Aggressiveness: Your device acts like a "loyalist." It will stay connected to its current AP until the signal is almost completely gone before even looking for a replacement.
High Aggressiveness: Your device acts like a "social climber." It constantly scans the environment for a better connection and will jump to a new AP the moment it offers a slightly stronger signal, even if your current connection is still perfectly usable. The Five Standard Levels
Most Windows-based network adapters (like those from Intel) offer five distinct levels:
Lowest: Only scans for new APs when the current signal is critically low. Medium-Low: A slight preference for the current connection.
Medium (Default): A balanced approach recommended for most users.
Medium-High: More frequent scans to ensure the best available signal.
Highest: Triggers a roaming scan even if the current signal is still good. When Should You Change It?
While Medium is usually the sweet spot, specific scenarios might require a manual tweak:
Set to High if: You move around a large office or house with many access points and find your device gets "stuck" on a weak, distant signal.
Set to Low if: You are gaming or on a video call and notice brief "blips" or lag. This is often caused by the device temporarily dropping the connection to "scan" for other APs. A lower setting prevents these unnecessary interruptions.
Battery Concerns: High aggressiveness can drain laptop batteries faster because the Wi-Fi card must work harder to constantly scan for nearby networks. How to Change the Setting (Windows) How To Change WiFi Roaming Sensitivity or Aggressiveness
 This set of more than 1,000 uniquely
designed RF & Electronics Stencils for Visio™
were built in Visio™ 2007 and tested in 2019. They use the .vss and .vsd
file formats, which is compatible with Visio™ 2003 up through the most
current version.
This set of more than 1,000 uniquely
designed RF & Electronics Stencils for Visio™
were built in Visio™ 2007 and tested in 2019. They use the .vss and .vsd
file formats, which is compatible with Visio™ 2003 up through the most
current version.
Every stencil symbol has been built to fit proportionally on the included A-, B-, and C-size drawing page templates (or use your own page if preferred). Components are provided for system block diagrams, conceptual drawings, schematics, test equipment, racks (EIA 19", ETSI 21"), and more.
Test equipment and racks are built at a 1:1 scale so that measurements can be made directly using Visio built-in dimensioning objects. Page templates are provided with a preset scale (changeable) for a good presentation that can incorporate all provided symbols. A look through the stencil sets below testifies to the claim of completeness, and a consistent appearance will assure a premium quality presentation. These symbols took many hundreds of hours to create, so the minimal cost can easily be justified for time they will save you.
Below are screen captures of all the stencil sets provided with RF & Electronics Schematic & Block Diagram Stencils for Visio™ (r4). Click on the thumbnails for large versions. Please check the NOTES section on this page for instructions and/or any updates.
| AC, DC, Signal Sources
|
 |
| Amplifiers, Opamps
|
 |
| Antennas, Towers
|
 |
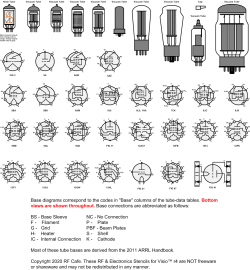
| ARRL 2011 Handbook Symbols |
 |
| Attenuators, Terminations
|
 |
| Connectors
Special "Connector Kit" makes building in-series and between-series adapters simple. |
 |
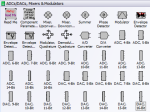
| Converters, Mixers, Modulators, Detectors
|
 |
| Couplers, Hybrids, Samplers
|
 |
| Digital, Logic
|
 |
| EIA 19" Equipment Racks
Special "Workbench Kit" makes building a workbench of any size easy. |
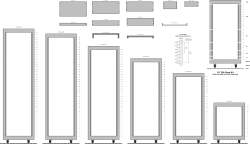 |
| ETSI (metric) 21" Equipment Racks
|
 |
| Filters, Diplexers, Duplexers
|
 |
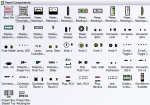
| Planes, Trains, and Automobiles, Wireless Devices
|
 |
| Panel Components
|
 |
| Resistors, Capacitors, Inductors, Transformers, Lamps, Passives
|
 |
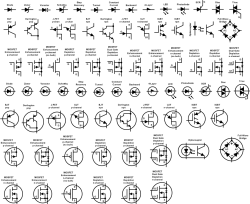
| Semiconductors
|
 |
| Substrate Stacks
|
 |
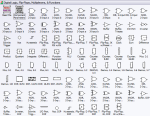
| Switches
|
 |
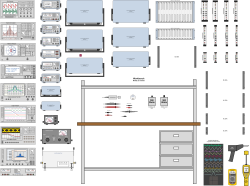
| Test Equipment
Flanges for rack mounting and frames for bench top placements included. Instruments are generic and can be modified as needed. |
 |
| Vacuum Tubes
|
 |
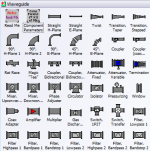
| Waveguide
|
 |
| Component Parameters
|
 |
|
Page Template, Size A Landscape
Page Template, Size B Portrait
Page Template, Size C Landscape
Smith Chart™ Smith Chart rights owned by the IEEE |
Page Template, Size A Portrait
Page Template, Size B Landscape
Page Template, Size C Portrait |


Copyright: 1996 - 2026 |
About RF Cafe RF Cafe began life in 1996 as "RF Tools" in an AOL screen name web space totaling 2 MB. Its primary purpose was to provide me with ready access to commonly needed formulas and reference material while performing my work as an RF system and circuit design engineer. The World Wide Web (Internet) was largely an unknown entity at the time and bandwidth was a scarce commodity. Dial-up modems blazed along at 14.4 kbps while tying up your telephone line, and a lady's voice announced "You've Got Mail" when a new message arrived... |
Copyright 1996 - 2026 All trademarks, copyrights, patents, and other rights of ownership to images
and text used on the RF Cafe website are hereby acknowledge My Hobby Website: My Daughter's Website: |
